
Customize API ( Customizer ) is the WordPress admin feature that allows you to modify colors, fonts, text, and almost everything that you want to change. Customizer provides a user-friendly interface with live-previewing with any change in the settings.
In this post, we are going to extend the customizer by adding some additional settings. Recently, I have added a customized layout for the YARPP plugin and added some additional settings to the WordPress Customizer.

Table of content
- Customizer Structure
- Create and Register Customizer
- Render Customizer Data to Frontend
- Complete Source Code
Customizer Structure
Let’s go through the Customizer structure and get familiar with how it works.

The Customizer is divided into two parts i.e. the controls and the preview. The control panel is divided into sections with related controls and settings.
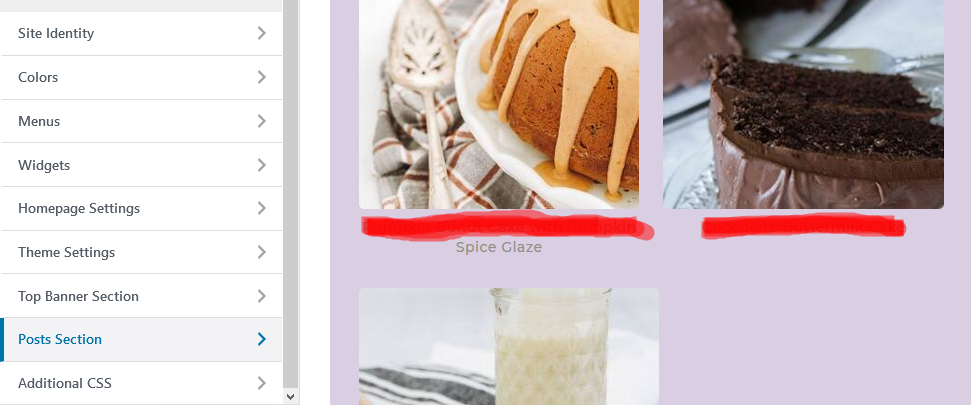
As you can see in the image, the Site Identity, Colors, Menus, Widgets, etc. are the sections and holds their relative controls and settings.
This is the basic customizer structure and enough to get started to create your own customizer settings.
Create and Register Customizer
Let’s create a file and give it the name like yarpp-customize.php. The filename suggests that it contains the YARPP plugins customizer codes. Now let’s create a function and later we are going to use this function to register our customizer with the customize_register action hook.
function wrg_yarpp_customizer_register( $wp_customize ) {

    ....
    ....

}
The customize_register hook provide us the instance of the WP_Customize_Manager class i.e. $wp_customize. Now let’s use the $wp_customize object to add new section, settings and control to the customizer.
function wrg_yarpp_customizer_register( $wp_customize ) {

    // Post Section
    $wp_customize->add_section(
        'wrg-yarpp-post-settings', array(
            'title' => __( 'Posts Section', 'theme-name' )
        )
    );


}
Now let’s add the customizer settings and controls for the plugin.
Create Customizer
// Post Section
$wp_customize->add_section(
    'wrg-yarpp-post-settings', array(
        'title' => __( 'Posts Section', 'theme-name' )
    )
);

// Add Title Text Support
$wp_customize->add_setting(
    'wrg_yarpp_title_text', array(
        'default'           => 'Related Posts',
        'sanitize_callback' => 'wp_kses_post',
        'transport'         => 'refresh',
    )
);

$wp_customize->add_control(
    'wrg_yarpp_title_text', array(
        'description' => __( 'Change the text for the YARPP title.', 'theme-name' ),
        'label'       => __( 'YARPP Title Text', 'theme-name' ),
        'section'     => 'wrg-yarpp-post-settings',
        'settings'    => 'wrg_yarpp_title_text',
        'type'        => 'text',
    )
);
As you can see in the codes, we have used the add_setting() and add_control() methods to add controls and settings for our newly created section.
Note: The ID should remain the same for both of the methods i.e. wrg_yarpp_title_text
We have used three arguments for the YARPP Title Text with add_setting() method i.e. default, sanitize_callback and transport. As the argument name suggests the default is used to set the default value i.e. Related Posts in our case. The sanitize_callback argument is used to used sanitized function and we have used the wp_kses_post function. The transport argument is used for rendering live preview.
Please check the WP_Customize_Setting class to learn more about the other arguments that we haven’t used in our codes.
Next, let’s move to the $wp_customize->add_control() methods arguments.
$wp_customize->add_control(
    'wrg_yarpp_title_text', array(
        'description' => __( 'Change the text for the YARPP title.', 'theme-name' ),
        'label'       => __( 'YARPP Title Text', 'theme-name' ),
        'section'     => 'wrg-yarpp-post-settings',
        'settings'    => 'wrg_yarpp_title_text',
        'type'        => 'text',
    )
);
We have used description, label, section, settings and type respectively. As the name suggests label is used to add label text and a description is used to display some hints related to field.
The section argument is used to assign the control to the belonging section i.e. wrg-yarpp-post-settings in our example. And the settings argument is used to tie the previously created settings with the name of the ID.
The type argument is to add the control type that could be text, textarea, checkbox, radio etc.
Now let’s see if everything working fine by attaching the wrg_yarpp_customizer_register() function with customize_register action hook.
add_action( 'customize_register', 'wrg_yarpp_customizer_register' );And don’t forget to include our yarpp-customize.php file in the functions.php file.

This is hows it looks after refreshing the customize settings. Now let’s move to the next part.
Render Customizer Data to Frontend
In the above section we have added custom setting to the Customizer that should work with the YARPP plugin. Now, we are going to learn how to render customizer data to the frontend.
We are going to use the get_theme_mod() function to retrieve the value from the customizer. Take a look to the YARPP plugin template.
<div class="wrg-yarpp-container">
    <h3 class="wrg-yarpp-title"><?php echo apply_filters( 'wrg_yarpp_title_text', __( 'Related Posts', 'theme-name' ) ); ?></h3>
    <div class="wrg-yarpp-content">
        ....
        ....
        ....
    </div>
</div>
As you can see, we have added a custom filter i.e. wrg_yarpp_title_text to display the heading text. Now we are going to use wrg_yarpp_title_text filter hook to render the customizer value.
add_filter( 'wrg_yarpp_title_text', function() {
    return get_theme_mod( 'wrg_yarpp_title_text', 'Related Posts' );
});
We have used the ID of the control section to retrieve the value. Now, whenever you change the title text from customizer it will reflect immediately through this filter hook to the frontend.
Complete Source Code
add_action( 'customize_register', 'wrg_yarpp_customizer_register' );

function wrg_yarpp_customizer_register( $wp_customize ) {

    // Post Section
    $wp_customize->add_section(
        'wrg-yarpp-post-settings', array(
            'title' => __( 'Posts Section', 'theme-name' )
        )
    );

    // Add Title Text Support
    $wp_customize->add_setting(
        'wrg_yarpp_title_text', array(
            'default'           => 'Related Posts',
            'sanitize_callback' => 'wp_kses_post',
            'transport'         => 'refresh',
        )
    );

    $wp_customize->add_control(
        'wrg_yarpp_title_text', array(
            'description' => __( 'Change the text for the YARPP title.', 'theme-name' ),
            'label'       => __( 'YARPP Title Text', 'theme-name' ),
            'section'     => 'wrg-yarpp-post-settings',
            'settings'    => 'wrg_yarpp_title_text',
            'type'        => 'text',
        )
    );

    // Add Background Color Support
    $wp_customize->add_setting(
		'wrg_yarpp_background_color', array(
			'default'           => '#ebe9ea',
			'sanitize_callback' => 'sanitize_hex_color',
            'transport'         => 'refresh',
		)
	);

    $wp_customize->add_control(
		new WP_Customize_Color_Control(
			$wp_customize,
			'wrg_yarpp_background_color',
			[
				'description' => __( 'Change the default background color for YARPP.', 'theme-name' ),
				'label'       => __( 'Background Color', 'theme-name' ),
				'section'     => 'wrg-yarpp-post-settings',
				'settings'    => 'wrg_yarpp_background_color',
			]
		)
	);
}


add_filter( 'wrg_yarpp_title_text', function() { return get_theme_mod( 'wrg_yarpp_title_text', 'Related Posts' ); } );
add_action( 'wp_enqueue_scripts', 'wrg_yarpp_css', 99 );

function wrg_yarpp_css() {

    $background_color = get_theme_mod( 'wrg_yarpp_background_color', '#ebe9ea' );
    $css = '';

    $css .= ( $background_color !== '#ebe9ea' ) ? sprintf(
        '
        .wrg-yarpp-container {
            background-color: %1$s !important;
        }

        ',
        $background_color
    ) : '';

    if ( $css ) {
		wp_add_inline_style( genesis_get_theme_handle(), $css );
	}
}
We hope this article will help you to learn how to use and extend the WordPress Customizer. Please don’t forget to share this article and follow us on Facebook and Twitter for more updates.