This OpenAI Agents SDK tutorial builds one small Python agent that answers inventory questions by calling a custom tool. The example is intentionally narrow: it looks up stock for a known product from local application data. That makes the tool-calling lifecycle easy to inspect before you connect an agent to a database, API, WordPress site, or WooCommerce store.
Important version note: agent SDKs, package names, model availability, and runtime requirements can change. The commands and API shape below are a Python example based on the openai-agents package pattern. Before publishing or deploying it, verify the current official SDK installation instructions, supported Python version, tool decorator API, and model name. Record the exact versions you confirm.
What You Will Build
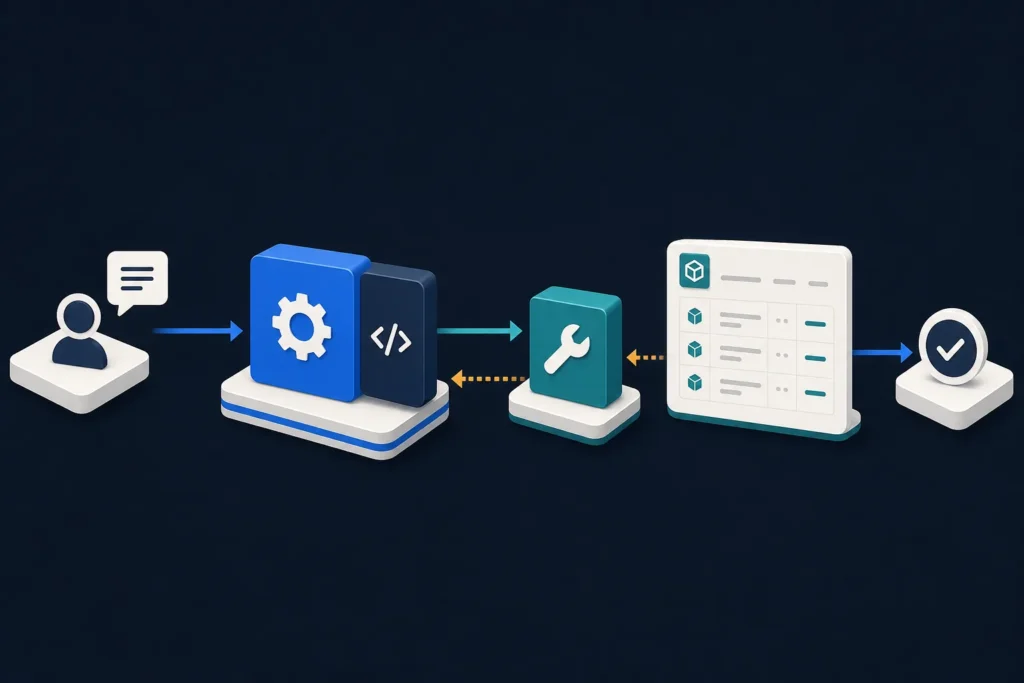
The finished script accepts a request such as “Is the mechanical keyboard in stock?” The agent receives focused instructions and has access to a lookup_inventory tool. Because the request requires local inventory data, the agent should call the tool, receive a structured text result, and use that result in its final answer.
The execution path is:
- Your application sends a user request to the SDK runner.
- The model reads the agent instructions and available tool description.
- The model chooses the inventory tool and supplies its arguments.
- Your Python function validates the argument and reads local data.
- The tool result is returned to the agent.
- The runner returns the agent’s final response.
This is an application-controlled tool, not a general-purpose action system. The tool can only read the three sample records you define. Keeping the first tool deterministic and read-only makes failures easier to diagnose.
Prerequisites and Version Assumptions
- A supported Python runtime. Use the Python version stated in the SDK documentation you verify; Python 3.10 or later is a sensible project assumption only if it is supported by the package version you install.
- An OpenAI API key available to the process as
OPENAI_API_KEY. - The OpenAI Agents SDK Python package. Verify its current package name and installation command before relying on
pip install openai-agents. - A model your account can use. This tutorial uses
OPENAI_MODELso model selection stays outside the code.
Create an API key in the appropriate OpenAI account area, then store it as an environment variable. Do not place it in source code, commit it to Git, print it in logs, or include it in screenshots. A local .env file is convenient for development, but it must be ignored by source control and loaded by your shell, editor, or a deliberately chosen environment loader.
Before sharing this project, record the output of python --version and pip show openai-agents. Those details turn an example into a reproducible starting point and make later SDK changes easier to identify.
Project Setup
Create a minimal directory:
tool-using-agent/
├── .env
├── .gitignore
├── main.py
└── requirements.txt
Initialize a virtual environment and install the SDK. The package command below is an assumption that must be checked against the official instructions for the version you use.
mkdir tool-using-agent
cd tool-using-agent
python -m venv .venv

# macOS/Linux
source .venv/bin/activate

# Windows PowerShell
# .venv\Scripts\Activate.ps1

pip install openai-agents
pip freeze > requirements.txt
Add this to .gitignore:
.venv/
.env
__pycache__/
For local development, put values in .env:
OPENAI_API_KEY=replace-with-your-key
OPENAI_MODEL=gpt-4.1-mini
The script below uses Python’s standard environment access and does not load .env itself. Configure your IDE or shell to load that file, or export the variables before running the program. For example, on macOS or Linux:
export OPENAI_API_KEY="replace-with-your-key"
export OPENAI_MODEL="your-verified-model-name"
python main.py
Create the First Agent and Custom Tool
Create main.py with this complete example. The imports and the @function_tool decorator are SDK-sensitive: verify them against the installed package documentation if your installed version differs.
import asyncio
import logging
import os

from agents import Agent, Runner, function_tool

logging.basicConfig(
    level=logging.INFO,
    format="%(levelname)s: %(message)s",
)
logger = logging.getLogger(__name__)

# Local application data for this tutorial only.
INVENTORY = {
    "mechanical keyboard": {"sku": "KB-100", "quantity": 7},
    "wireless mouse": {"sku": "MS-200", "quantity": 0},
    "usb-c hub": {"sku": "HB-300", "quantity": 12},
}


@function_tool
def lookup_inventory(product_name: str) -> str:
    """Look up stock for a product in the local inventory.

    Use this tool for questions about availability or stock quantity.
    Provide the product name without a quantity or other extra text.
    """
    normalized_name = product_name.strip().lower()

    if not normalized_name:
        return "Error: product_name must not be empty."

    if len(normalized_name) > 80:
        return "Error: product_name is too long. Provide a product name only."

    logger.info("lookup_inventory called for product=%r", normalized_name)

    item = INVENTORY.get(normalized_name)
    if item is None:
        return f"Product not found: {normalized_name}."

    quantity = item["quantity"]
    status = "in stock" if quantity > 0 else "out of stock"
    return (
        f"Product: {normalized_name}; SKU: {item['sku']}; "
        f"quantity: {quantity}; status: {status}."
    )


async def main() -> None:
    if not os.getenv("OPENAI_API_KEY"):
        raise RuntimeError(
            "OPENAI_API_KEY is not set. Add it to your environment and try again."
        )

    # Verify that this model name is available for your account and SDK version.
    model_name = os.getenv("OPENAI_MODEL", "gpt-4.1-mini")

    agent = Agent(
        name="Inventory Assistant",
        model=model_name,
        instructions=(
            "You answer questions about the local inventory. "
            "For every availability, stock, SKU, or quantity question, "
            "you must call lookup_inventory before answering. "
            "Do not guess product availability. "
            "Use the tool result as the source for your answer. "
            "If the tool reports an error or product not found, explain it briefly."
        ),
        tools=[lookup_inventory],
    )

    user_request = "Is the mechanical keyboard in stock?"
    logger.info("Running agent for request: %s", user_request)

    result = await Runner.run(agent, input=user_request)

    print("\nFinal response:")
    print(result.final_output)


if __name__ == "__main__":
    asyncio.run(main())
The agent configuration has three important parts. name labels the agent for people reading logs and traces. instructions define its job and boundary: it must not estimate inventory. tools gives it a limited list of application capabilities.
The tool definition matters just as much. Its function name becomes a meaningful capability label, its docstring describes when it should be used, and its typed product_name argument provides a schema that the SDK can expose to the model. The function still validates its own input. Schema generation helps the model form a request; it does not replace defensive application logic.
Run the Agent and Trace Execution
Run the program with:
python main.pyRepresentative output may look like this. Exact wording varies by model and SDK version, so treat it as expected behavior rather than a tested transcript.
INFO: Running agent for request: Is the mechanical keyboard in stock?
INFO: lookup_inventory called for product='mechanical keyboard'

Final response:
Yes. The mechanical keyboard is in stock with a quantity of 7.
The log line inside lookup_inventory confirms that your Python code ran. It deliberately logs only a normalized product name, not credentials or full request headers. The runner returns a result object, and final_output is the final user-facing answer after any tool call is complete.
Many SDK configurations also support built-in tracing or event inspection. Verify the current tracing configuration and privacy behavior before enabling it. In development, tracing can help you inspect the model’s tool selection and arguments. In production, decide which request data is appropriate to retain before collecting traces.
How the Agent Decides to Call the Tool
Tool use is guided by the model, the tool metadata, and the agent instructions. The request contains “in stock,” the tool describes stock lookup, and the instructions explicitly require a lookup for inventory questions. Together, those signals make a tool call the appropriate route.
This does not mean a tool call is guaranteed by a vague prompt. If you ask “What products do you sell?” but provide no product-list tool, the agent may answer from the information it has or state that it cannot determine the answer. Design tools around a clear business operation and give agents explicit rules for when they are mandatory.
Troubleshooting and Safe Implementation
The API key is missing
If the script raises the custom OPENAI_API_KEY is not set error, the process cannot see your environment variable. Restart the terminal after exporting it, check your editor’s run configuration, and confirm that a local environment file is actually being loaded. Never solve this by hard-coding the key.
An import or constructor fails
Check the installed package with pip show openai-agents, then compare the installed version’s documentation with the imports, decorator, agent constructor, and runner call in this tutorial. SDK APIs can change between releases. Also confirm that your selected Python version is supported and that you are running the virtual environment where the package was installed.
The agent answers without calling the tool
First, use a request that plainly needs the tool, such as the keyboard example. Next, make the tool description specific and use firm instructions such as “must call.” Avoid putting inventory facts in the instructions, because that gives the agent another route to an answer. Finally, inspect logs or verified tracing output to see whether the tool was offered and whether arguments were malformed.
The tool receives bad arguments or raises an error
Return clear, bounded error messages for expected input problems, as the example does for blank and overly long names. For real integrations, catch expected database or API errors and return a safe message the agent can explain. Log enough diagnostic context for developers, but omit secrets, authorization headers, personal information, and raw payment or order data.
Keep tool permissions narrow
Instructions tell an agent what it should do; permissions determine what it can actually do. Treat the latter as the stronger control. A production WooCommerce tool should not be able to delete orders merely because its agent instructions say “be helpful.” Create separate read and write tools, validate every input, scope credentials to the minimum access needed, and require an application-side approval step before consequential actions such as refunds, publishing, or customer messaging.
Next Steps and Extension Ideas
Once the local example works, replace the INVENTORY dictionary with one well-defined integration at a time. For example, a tool could query your own database, call a product API, retrieve a WordPress post by ID, or read WooCommerce stock through an API client. Keep the tool’s input and return shape small and explicit so that failures remain understandable.
- Add a second read-only tool for product pricing, with a distinct description and schema.
- Return structured fields from application code, then format a safe reader-facing response.
- Add request IDs and audited tool logs without logging secrets.
- Introduce approval checks before any write operation.
- Use webhooks or scheduled jobs to turn the same pattern into a WordPress or WooCommerce automation workflow.
Bookmark this tutorial as a version-sensitive reference, then continue with a related AI automation or API integration guide to apply the same tool-calling pattern to a real workflow.